|
|
Post by madmax on Nov 29, 2011 5:40:16 GMT
Looks alright that.  |
|
|
|
Post by nick121170 on Nov 29, 2011 12:27:41 GMT
interesting project,keep up the good work and photos
|
|
|
|
Post by allsorts on Nov 29, 2011 23:33:27 GMT
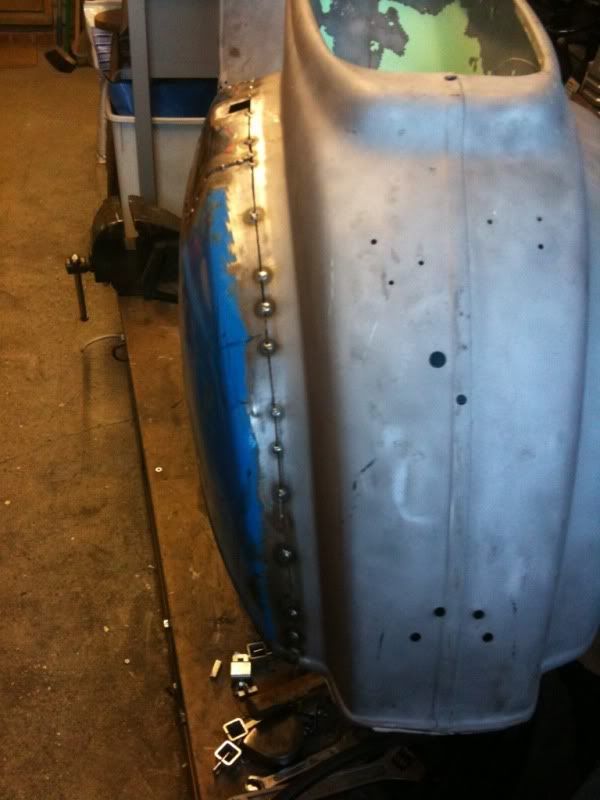
Tonight I have altered the cuts to allow the gap at the join to be “eased and adjusted”.  A series of cuts is required to allow the tunnel aperture to be closed up. Note the small cut on the flange “A”. Note the two brackets screwed to the MDF. These allowed me to ensure that the two side of the cut-tunnel are squeezed-in evenly.  I tacked the joins together, slid the front end back into place using the box section steel as a guide, and then welded it up.  I know I am not the best gas welder in the world (in fact, gas isn’t ideal for this type of sheet metalwork), but I have got good penetration and I am sure it will be strong when the floor is welded on. This might be a good time for you to buy some shares in the P38 body filler company. |
|
|
|
Post by Spanish Rob on Nov 30, 2011 0:56:21 GMT
Another thrilling instalment! Great stuff! Brunel is alive and kicking in spirit at least!!! Fantastically clear pictures too - I can see every detail! ;D Off to call my broker as directed  Viva la Super Sprrrinto  |
|
|
|
Post by 0ddball on Nov 30, 2011 13:21:57 GMT
Brunel is alive and kicking in spirit at least!!! Im thinking more fred dibnah, back street mechanics and all that. MDF jig, Nice!!! I love a ghetto build. Good luck with this Brother! |
|
|
|
Post by allsorts on Dec 4, 2011 23:20:43 GMT
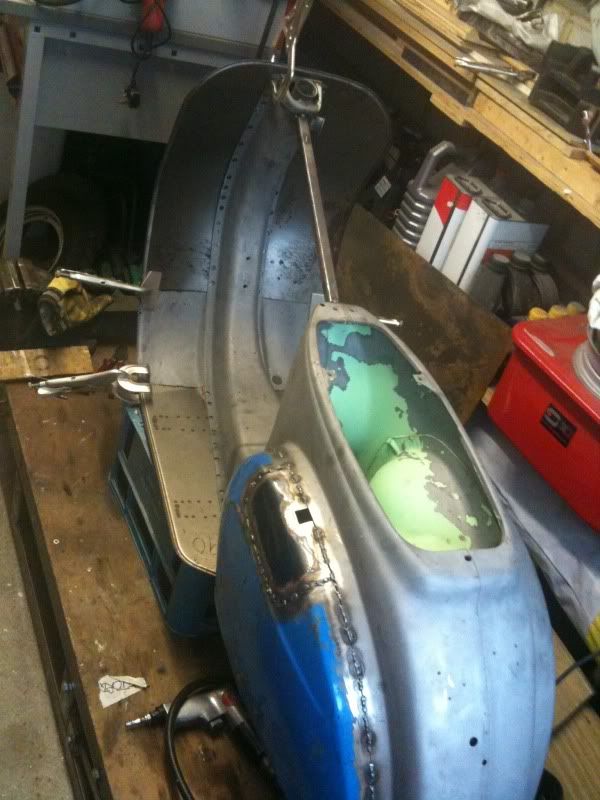
So, back in the shed for an hour this afternoon, and it is time to tackle the rear panel work. Thanks for SteveC, I have a V50 back end, though even Steve will admit that it has seen better days. There are a few problems. One is that some bits of both frames are missing. This means here are no identical reference points to use a datum point. This is a problem, as is the difference between the Spanish frame and the Italian frame. Have a look at the template I cut to compare one of the angles.   I’m not sure how I am going to address this yet, but I am going to have to push on. I decided that welding diagonally across the panel would cause too much distortion, and so I chose to cut and join along the top of the panel, as there is a strong curve in the side panel either side of the intended join.    I made a template for the back of the scooter, using the rear seat mount as a reference point and then reached for the 1mm cutting disc in the angle grinder. Gulp.   Next, to adjust the joins and tack it together. |
|
|
|
Post by Spanish Rob on Dec 5, 2011 3:04:22 GMT
Hi Allsorts  Were you really into Frankenstein as a kid by any chance? ;D |
|
|
|
Post by scfcpinky on Dec 5, 2011 16:35:34 GMT
|
|
|
|
Post by allsorts on Dec 6, 2011 16:39:53 GMT
Thanks Pinky.
It was reading your thread that encouraged me to have a go myself, though I obviously started some paces behind you.
I still have several make-or-break tasks to execute before I discover whether I am wasting my time or not.
|
|
gaz72
100 Sport

Posts: 94
|
Post by gaz72 on Dec 6, 2011 20:03:13 GMT
great thread and best of luck !
|
|
|
|
Post by sugarlump on Dec 6, 2011 23:36:40 GMT
Nice work mate, good amount of thought going into each chop! I did a side panel transplant and sliced it in exactly the same place as you, turned out fine, I have a pic somewhere if you need it.
Good luck with the rest of the welding, especially if you're using oxy/acetylene, but I think it's obvious you know what your doing!
|
|
|
|
Post by amazombi on Dec 7, 2011 16:04:33 GMT
...but I think it's obvious you know what your doing! When I read the opening post I really thought this again is somebody taking a larger bite than he can chew, but as you say, this is all pretty clever and speaks volumes about Allsorts' skills. Well done. |
|
|
|
Post by allsorts on Dec 7, 2011 19:52:40 GMT
I'm off to the workshop now to light up the welding torch. If things do not go well, this could be my last post on this thread..... |
|
|
|
Post by jacques on Dec 7, 2011 20:54:01 GMT
Well done mate, this is some very good work!  Make's me want to tackle the frame in the shed! J |
|
|
|
Post by allsorts on Dec 8, 2011 22:38:41 GMT
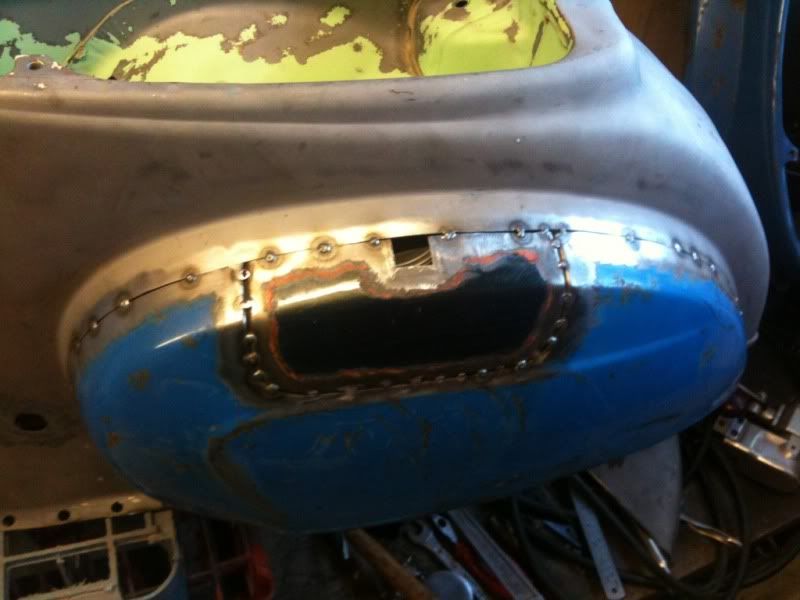
Thanks for the kind words of encoragement, but it was not such a good night in the workshop. I could just keep quiet about it, but I’m making mistakes here so you don’t have to. Therefore, I’ve decided to post up a failure. Thanks started alright. I had a hole in the bottom of the back of the tank area, where rust had got-in around the bracket for the spare wheel (remember, the donor scooter is Spanish). I wanted to repair this before I fitted the new back-end, as access was much better in its present state. I removed what was left of the bracket and cut a square hole and a corresponding square from some mild steel sheet. I was able to hold this in place quite easily, tack it and complete the weld. Not pretty, but good penetration. I also welded along the entire seam, as this added strength and would keep water out of this seam in future. So far so good.  I was aware that I had not cut the join-line correctly, so before I tried to weld the back-end onto the frame, I had to add a small triangle of steel. Before long, I realised that even holding a small triangle of steel on such a complex shape was a real problem. It took about half an hour to cut and shape the triangle, then a further half hour just to work out how to hold it in place prior to welding. Ridiculous. Once attached, the triangle was trimmed (it is best to make small items of sheet metal too big, so it is left effected by heat during welding) ready for the back end. The good news is that the centre seam is a common size and location to both Italian and Spanish scooters, so finally I have found a reference point.  Again, the issue of fitting the two parts together is holding them prior to welding. At first all went well. I made three or four tacks but..... When I checked the front of the bubble, it was about 4mm out (note yellow paind showing through from under the bubble). Damn.  It will all have to come off again, but when I try next time, I’ll try to monitor more locations before I start welding. Nobody said it was going to be easy. |
|
|
|
Post by amazombi on Dec 9, 2011 6:07:37 GMT
Do you think you could drill a few holes and use strips of sheet metal with slots to slide things into place and "bolt" them in position, or something like that?
|
|
|
|
Post by bikegrim on Dec 9, 2011 8:36:01 GMT
I think this is one of the most intresting and amibitious projects I have seen on here = proper renovation plus innovation in making the project an SSrep. Fair play to you. I can't wait to see the finished scooter. pm sent.
|
|
|
|
Post by allsorts on Dec 9, 2011 10:20:23 GMT
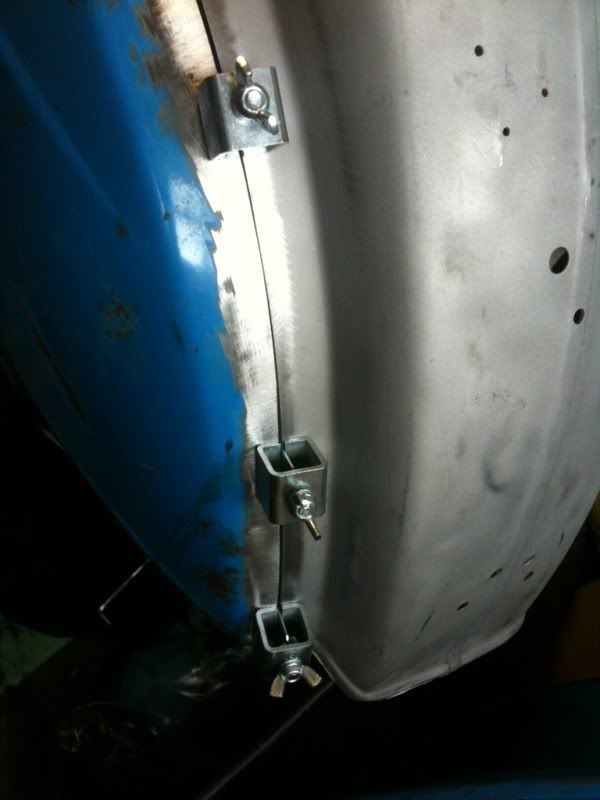
Do you think you could drill a few holes and use strips of sheet metal with slots to slide things into place and "bolt" them in position, or something like that? There were some clever little clamps for sheet metal featured in an edition of Scootering a few moths back. I haven't time to buy them, so I am going to make some. I'll take some photos and place them on the forum in a separate thread so others can copy. I can't wait to see the finished scooter. pm sent. I can't wait to see the finished item either, as there are still plenty of challenges ahead. Thanks for the pm Gareth. I have replied. |
|
|
|
Post by sugarlump on Dec 9, 2011 16:44:45 GMT
|
|
|
|
Post by Spanish Rob on Dec 9, 2011 17:19:02 GMT
allsorts Dont give up. I think even Corradino D'Ascanio will be cheering you on! |
|


 Make's me want to tackle the frame in the shed!
 Anyway I don't think where you're at is beyond fixing by any stretch. You dont need telling but a Mig makes this sort of thing easier mate ;D