|
|
Post by tzsteve on Jun 26, 2015 14:53:32 GMT
just got a new ETS crank from stoffis 62 euro including p+p, vat etc. and they do paypal now
even though the crank has the piagio logo on the rod the next thing is to get a silver plated bigend bearing and consider a different rod. but before i split the crank i`ll check it just to see how accurate they are when they leave the factory.
progress has been slow but that`s life
|
|
|
|
Post by pugwash on Jun 27, 2015 15:30:29 GMT
Have you fitted the stator pickup yet?
|
|
|
|
Post by tzsteve on Jun 27, 2015 16:34:33 GMT
no i need to get some crank bearings so i can see how the flywheel sits in the case and then fit the fan etc. so it`s on go slow till payday but i have done a few little bits such as milling the slots in the backplate and can move the stator by about 40 degrees when it`s in place. see you soon
|
|
|
|
Post by unclechufty on Jun 27, 2015 20:10:40 GMT
Don't forget piccys of any new machining. I like to see the results of a man that can.
|
|
|
|
Post by tzsteve on Jun 27, 2015 20:26:47 GMT
thanks mate, as and when `cos we all like the photo`s.
the job for the next day or two is the front disk. it should be back from the welders on monday, then i drill the damper holes in the right place.
buying the disk put a little hole in my budget but the price was one that i was unlikely to see again this year.
and of course if she asks it was new old stock and we devide the price by ten when talking amongst the gents if the ladies are within earshot, so the disk and forks where close to £25 she can understand me buying them and making her do without the flowers for the livingroom.
|
|
|
|
Post by henri on Jun 28, 2015 8:27:39 GMT
flowers just die on ya ,whereas the disc brake stops you dying , she will get onboard with that logic an think £25 well worth the price .H
|
|
|
|
Post by tzsteve on Jul 1, 2015 15:23:42 GMT
 this is how it looked after the welding £10 to get the hole filled in. and out with the rotozip (one of my favourite toys) to cut the excess weld away. this took a few minutes, then drilled a fresh hole in the right place  next is cutting a little from the top edge to allow space for the damper  this is how it looks now and with the damper in place  it`s all simple jobs that need to be done and help to get the new work closer to being finished. over the weekend a buddy and i had a close look at the ETS crank that I got from stoffis(62 euro) the accuracy is realy good. the total run out is about 0.005mm. i did not take the two roller bearings HK2212 out of the lump of aluminium as i thought if i tried to remove them prior to welding, chance was they would get damaged and being left in would help reduce the risk of distortion during welding. so now i need a couple of bearings and i have another lump to spray at a later date. the job has now come to a standstill due to lack of funds and household bills, but payday aint far off |
|
|
|
Post by tzsteve on Jul 15, 2015 15:05:37 GMT
My current engine has been running a little weak at tickover for the last few weeks and getting progresivley worse. i even tried a carb change and it got much worse. both carbs are about 25-30 years old, so it could be two dirty carbs. the normal problem in this situation is an air leak around the bottom of the barrel or from the manifold gasket. finding an air leak can be a pain. so i decided to do a propper check for air leaks. using this little bit of kit    i pumped the engine up to a preasure of 0.8 bar and sprayed a little soapy water on all the normal places that you would check for an air leak. if there is an air leak it normaly shows up as a few bubbles. as no bubbles seemed aparent i again pumped the engine up to 0.8 bar and left the engine for ten minutes while i made a brew ( it`s very importent never to suffer any stress while working on an engine) after ten minutes the preasure had dropped to 0.6 bar, a loss of 0.2 Bar in ten minutes, then i left the engine for another ten minutes at 0.6 bar, and again the preaure loss was only 0.2 bar over ten minutes.   this is not enough to worry about, i do not have any air leaks other than the normal small loss past the oilseals. a wise lambretta man who i know, has an ultrasonic cleaning bath. so the weekend job will be to strip and clean the carb. meanwhile the new engine is at a standstill but payday is almost here, so that means new bearings and a chance to get some tools out and have a play in my garage come playroom. i hope to do some work on both the barrel and flywheel/ignition. |
|
|
|
Post by henri on Jul 17, 2015 7:13:29 GMT
nice watch ,pawn it n payday can wait ,engines to build ,playrooms to be played in ,
but as you reckon that sort of pressure drop is well within tolerances ,an just air escaping past oilseals , as the crank aint turning there not sealing properly, 3 psi in 10 mins/cuppa breaks really good , an a bar of pressures bout what the usual running pressure is,if only momentary .
am wondering if it is old/worn/leaky carbs-slides ,or maybe that much weight (carb) on the end of a 10-12" lever (the manifold)is working the joint an creating a leak there .not that ive a fix if it is,just a idle thought/consideration, if it comes back again that would be my first culprit i think, H
|
|
|
|
Post by tzsteve on Jul 18, 2015 15:19:45 GMT
the manifold is held with 2 A4 stainless bolts and a blob of loctite on the gasket face/gasket, but there was no leak showing with the soapy water so i`m still tempted to go with crud in the very old carb.
but you are right an amal is a big lump on a very long manifold. the slides are my own made from phosie bronze and industrial chrome plated. so slides still in good condition.
However, a worn carb-body is something i did not even consider but well worth looking at if i still have the same problem after the ultrasonic cleaning.
thanks for your input H.
|
|
|
|
Post by nick121170 on Jul 19, 2015 5:59:36 GMT
why do you think a 3 psi drop is nothing to worry about?
the area you are pressurizing is obviously small in volume.
just asking by the way not trying to correct you?
|
|
|
|
Post by henri on Jul 19, 2015 8:39:25 GMT
lip seals work by creating a doughnut shaped high pressure zone around the rotating shaft they sit on ,as the shaft/crank wasnt rotating during the test they werent actually sealing fully ,only leaking 3 psi because they were in good condition an standing very close to the crank .H
|
|
|
|
Post by tzsteve on Jul 22, 2015 15:48:15 GMT
why do you think a 3 psi drop is nothing to worry about? the area you are pressurizing is obviously small in volume. just asking by the way not trying to correct you? a mate sent me this link Link section 5 is the relevent bit |
|
|
|
Post by henri on Jul 23, 2015 7:44:47 GMT
was routing thru some old bike mags last nite ,an came across a 1984 classic bike article on a "carb doctor" ,guy specialised in amals as they werent reproducing spares back then ,it says "the way to spot wear is to set throttle to half open an wiggle the slide around.if you can feel about 1/16" movement with used not new slide it needs attention" .as your slides are home made to the modern spec not the crappy zinc slide in zinc/ali body amal use to do ,i'm not sure if thats relevant .but he went on to say "a simple visual check of the body wont reveal much because the peculiar wear pattern is difficult to discern.almost all the wear is around the inlet on engine side in a circular,countersunk pattern."
earlier in article he talks about boring bodys out 25 thou n making up sleeves for slides to remove wear/leaks , if ya pm us a e mail address i'll scan it in an send ya a copy ,if it might be some use . guy was avon engineering,avonbridge,scotland , but would be in his 70's now so doubtful he's still going . H
|
|
|
|
Post by tzsteve on Jul 23, 2015 15:01:56 GMT
thanks for the info H. but for all the messing around i`d just get a new body. as you say at one time amal spares were a bit limitted. got the carb back on scoot and it`s running as it should
|
|
|
|
Post by tzsteve on Jul 23, 2015 16:15:30 GMT
just made a couple of dummy bearings from a bit of nylon so that i could start work on the stator and flywheel. these are handy as they can be fitted without heating the case or resorting to big hammers when i need to remove them.  so the stator back plate is now in position having milled a few slots for the stator screws.  the ugly allen screws are only a temporary aid to hold the stator in place while i`m working things out. i had a wise lambretta man weld a lug on to my honda stator to give me a place to hold the pickup.   this is the stator in place in the case i can`t modify the flywheel to use an inward facing pickup so this seemed a good aproach. the plan is to fit 2 small super stong magnets into the fan back plate.  this is the underside of the flywheel and fan backplate.  at the moment i have a couple of nuts and washers holding the backplate to the flywheel i intend to replace the washers with one flat ring of about 90mm diameter with a couple of extra holes for the flywheel holder. then trim the studs down and use a couple of half nuts as a space saver. after that i can start fitting the magnets and the fan. currently waiting on the magnets to come from china. other jobs that need doing soon includee getting a drt 105mm rod kit and fitting this to the crank, crank cutting, making an 8mm packer for the barrel, then it`s all simple standard stuff |
|
|
|
Post by GeorgeS on Jul 23, 2015 16:21:04 GMT
Hats off Steve, enjoying following your progress. Full respect to you for making your own path to a solution.
|
|
|
|
Post by henri on Jul 23, 2015 18:03:51 GMT
that is some supreme "outside the box" thinking , nice , lookin good , H
|
|
|
|
Post by tzsteve on Jul 23, 2015 18:20:07 GMT
I`m just hoping it all holds together when it`s going. the last thing i want is a flywheel coming apart at revs and taking the case with it.
but you never know untill you try.
|
|
|
|
Post by tzsteve on Jul 29, 2015 14:59:48 GMT
been playing with the stator again and done a little rewinding, the re-winding is not 100% neat as i do not have a machine for winding this type of bobbin. with standard scooter stators it`s simply a case of holding the bobbins by hand and setting too. what i did was to use an empty biro tube to guide the wire onto the bobbins 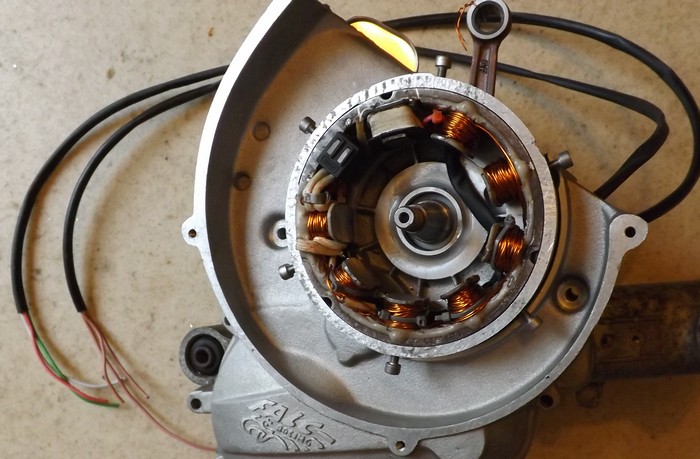 this is a test fit prior to coating everything with resin 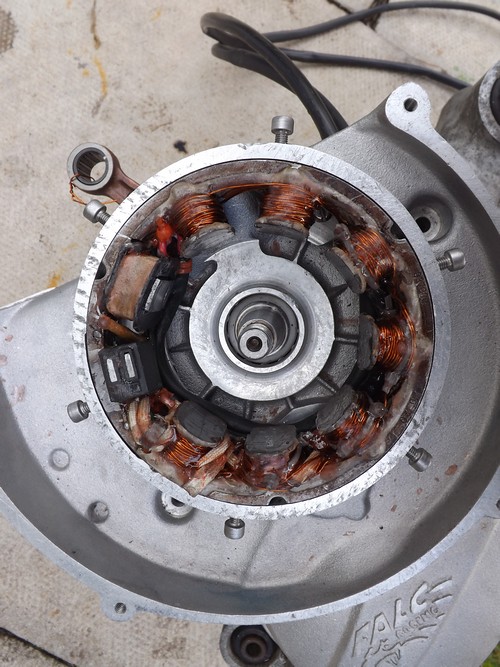 and then with all the parts painted with three coats of resin. the resin does not do a lot for the appearence but it will stop the wires from vibrating and rubbing against each other. its three phase and should give over 80 watts with no problem. i did find that the leadout wires from the stator got caught on the rotor so i needed to remove a little from the back of the rotor. as shown 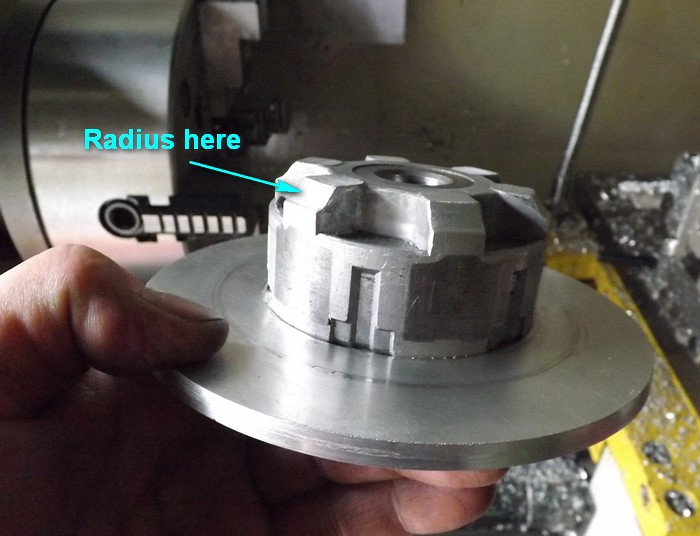 the next things i need to do with this lot is fit the magnets (still on their way from china) and have a look at the woodruff key slots. the one in the rotor is 4mm wide and the one in the crank is 3mm wide, the normal way of cutting the crank slot is on a milling machine. as i don`t have a miller i`m going to spend a little time trying to find a way of widening the crank slot??? |
|